

Master Indoor Sauna Ventilation for Health and Comfort
Did you know that experts recommend changing the air in your sauna up to six times every hour for peak comfort and safety? Proper ventilation is the secret to an indoor sauna that feels refreshing, regulates temperature smoothly, and keeps moisture in check. Whether you are installing a new sauna or upgrading your current setup, learning how to assess, design, and fine tune your ventilation system can make every session more enjoyable and safe.
Table of Contents
- Step 1: Assess Room Requirements For Effective Ventilation
- Step 2: Plan Vent Placement And Airflow Pathways
- Step 3: Install Ventilation Components Safely
- Step 4: Optimize Airflow For Efficiency And Comfort
- Step 5: Test Ventilation Performance And Adjust Settings
Quick Summary
| Key Point | Explanation |
|---|---|
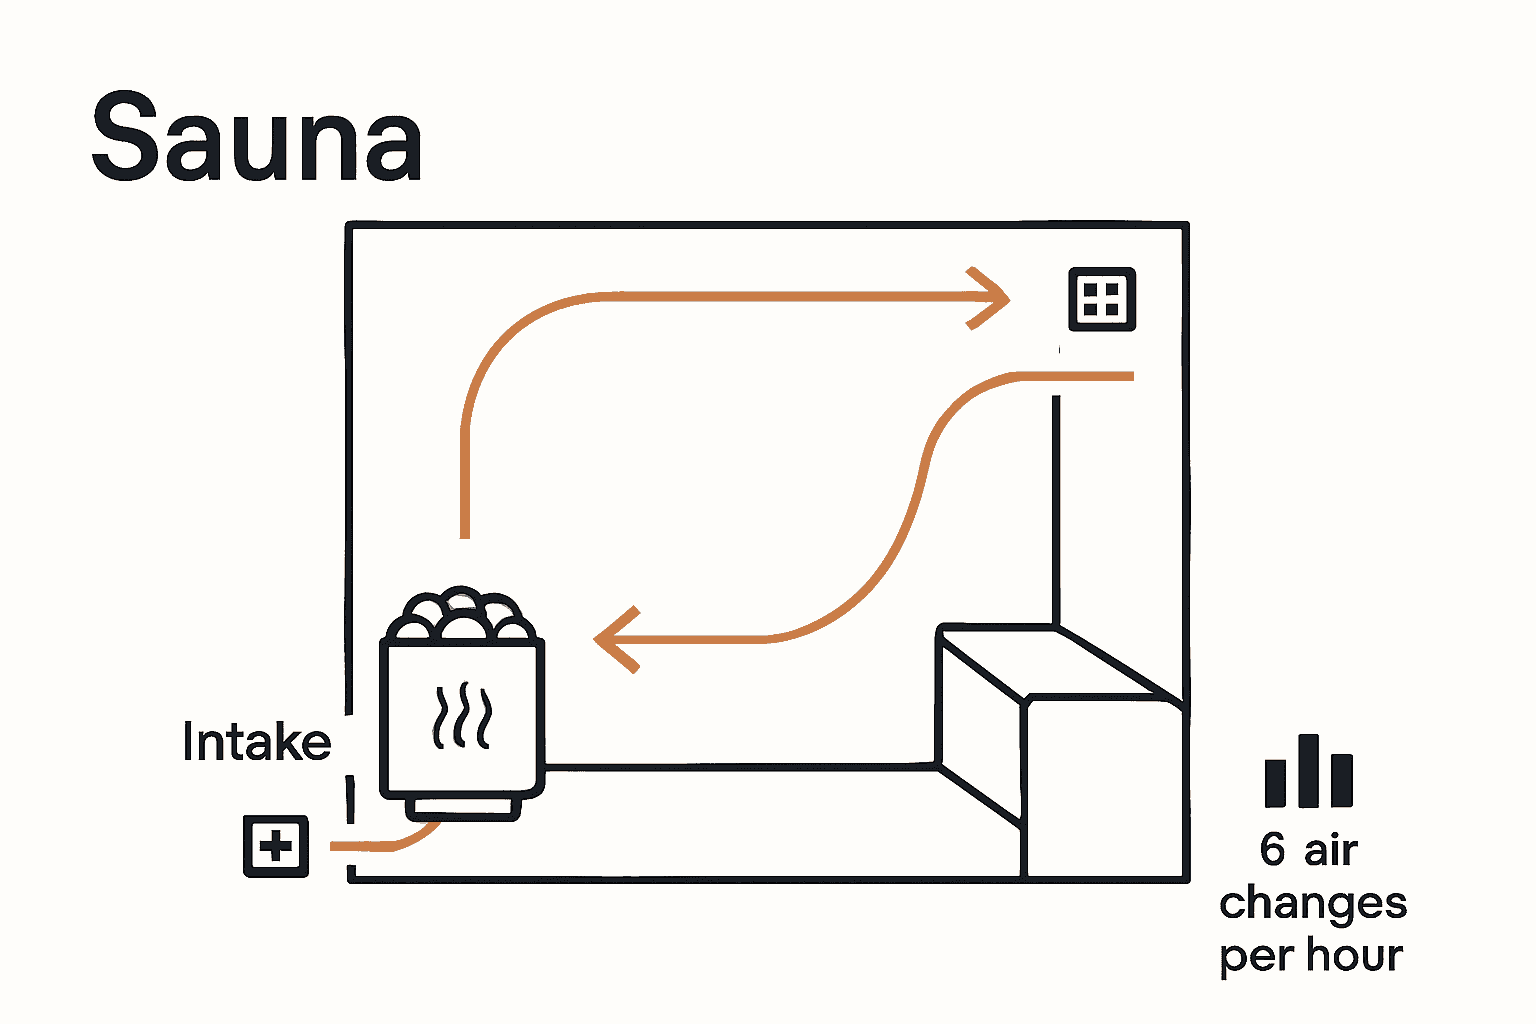
| 1. Install dual vents for airflow | Use a lower intake vent by the heater and an upper exhaust vent for effective air circulation. |
| 2. Achieve six air changes per hour | Ensure your sauna refreshes its air completely every ten minutes for optimal comfort and safety. |
| 3. Position vents strategically | Place the intake near the heater and the exhaust high on the opposite wall to promote even heat distribution. |
| 4. Use adjustable vents for flexibility | Adjustable vents allow you to fine-tune airflow based on user comfort and sauna size, enhancing the experience. |
| 5. Test and monitor ventilation performance | Regularly evaluate air movement and temperature consistency with tools like digital thermometers for a comfortable sauna. |
Step 1: Assess Room Requirements for Effective Ventilation
Evaluating your indoor sauna space for proper ventilation is crucial to creating a comfortable and safe wellness environment. Understanding your room’s specific requirements will help you design an airflow system that maximizes your sauna experience.
According to Hoffer Glass, effective sauna ventilation requires strategic vent placement. You will want to install two key components: a lower intake vent positioned near the heater and an upper exhaust vent that enables continuous air circulation. This dual vent approach ensures fresh air enters the space while allowing warm air and moisture to escape efficiently.
As recommended by Harvia Support, aim for air changes six times per hour. This means your entire sauna volume should be completely refreshed every ten minutes. When positioning your vents, be careful to avoid placing them too close to temperature sensors, which could disrupt accurate heat readings.
Pro Tip: Measure your sauna room dimensions precisely before purchasing vents to ensure proper sizing and optimal airflow.
By carefully assessing your room and implementing these ventilation strategies, you will create a sauna environment that promotes comfort, safety, and an exceptional wellness experience.
Step 2: Plan Vent Placement and Airflow Pathways
Creating an optimal airflow system in your indoor sauna requires strategic planning of vent placement to ensure consistent air circulation and temperature regulation. Your goal is to design a ventilation pathway that promotes comfortable and healthy sauna sessions.
According to Steam Sauna Bath, the ideal vent configuration involves installing the air intake vent under or directly next to the heater, while positioning the exhaust vent near the floor and as far from the heater as possible. This strategic placement creates a natural air circulation pattern that helps distribute heat evenly and remove excess moisture.
Similarly, Saunum recommends maintaining a consistent approach to natural air extraction. By keeping the air supply close to the heat source and the outlet near the floor, you create a seamless airflow that prevents stagnant air and supports a more comfortable sauna environment.
Pro Tip: Use adjustable vents that allow you to fine tune airflow based on the number of users and personal comfort preferences.
With your vent placement carefully planned, you are ready to move forward in creating a well ventilated and enjoyable indoor sauna experience.
Step 3: Install Ventilation Components Safely
Installing ventilation components for your indoor sauna requires precision and careful planning to ensure optimal air circulation and safety. You will be creating a system that supports healthy and comfortable sauna experiences.
According to Saunafin, the ideal passive venting approach involves strategically positioning your inlet and outlet vents. Place the inlet vent low behind the heater and the outlet vent high on the opposite wall. This configuration ensures effective heat distribution and promotes natural air movement throughout your sauna space.
Furthermore, Saunafin recommends maintaining approximately six air changes per hour in a private sauna. Achieve this by positioning your fresh air inlet below the heater and the air outlet higher than the upper benches. This setup guarantees continuous air circulation and prevents potential heat and moisture stagnation.
Pro Tip: Always wear protective gloves and use appropriate tools when installing vent components to prevent injury and ensure secure mounting.
With your ventilation components carefully and safely installed, you are now ready to create a comfortable and well regulated sauna environment.

Step 4: Optimize Airflow for Efficiency and Comfort
Fine tuning your sauna’s ventilation system is crucial for creating the perfect balance of temperature, humidity, and air quality. Your goal is to transform your indoor sauna into a comfortable wellness sanctuary that provides consistent and enjoyable heat circulation.
According to Sun Home Saunas, the key to optimal airflow lies in carefully balancing the air volume between your inlet and outlet vents. This balanced approach prevents unwanted pressure buildup and ensures even temperature distribution throughout the entire sauna space. By maintaining this equilibrium, you eliminate the risk of stale air pockets and create a more consistent and comfortable environment.
To achieve maximum efficiency, consider using adjustable vents that allow you to fine tune airflow based on the number of users, sauna size, and personal comfort preferences. Pay attention to how air moves through the space and make small incremental adjustments to find your perfect ventilation sweet spot.
Pro Tip: Periodically test your ventilation system by using a small piece of tissue paper near the vents to verify consistent air movement and detect any potential blockages.
With your airflow now optimized, you have created a sauna environment that supports relaxation, health, and ultimate comfort.
Step 5: Test Ventilation Performance and Adjust Settings
Evaluating your sauna’s ventilation system is crucial to ensure a safe, comfortable, and enjoyable wellness experience. You will learn how to systematically check and fine tune your airflow for optimal performance.
According to Nordic Sauna, proper ventilation is essential for maintaining fresh air, ensuring even heat distribution, and creating a comfortable sauna environment. Inadequate ventilation can lead to significant issues such as insufficient oxygen levels and uneven temperature zones that compromise your overall experience.
For larger indoor sauna spaces, Shym Saunas recommends considering active ventilation systems like fans to continuously circulate fresh air. This becomes particularly important in areas where natural temperature differences might not generate sufficient airflow. During your performance test, pay close attention to air movement, temperature consistency, and overall comfort.
Pro Tip: Use a digital thermometer and humidity meter to track temperature and moisture levels during your ventilation performance test.
By methodically testing and adjusting your sauna’s ventilation, you create an environment that maximizes comfort, safety, and the therapeutic benefits of your indoor sauna experience.
Elevate Your Indoor Sauna Experience with Expert Ventilation Solutions
Achieving the perfect balance of airflow, temperature, and comfort is essential for any indoor sauna enthusiast. This article highlights the challenges of proper vent placement and airflow optimization to avoid stale air, uneven heat, and moisture buildup. If you want to enjoy all the health benefits of your sauna such as improved circulation and stress relief without compromising safety or comfort, understanding and implementing effective ventilation is key.
At Best Life Sauna, we offer a wide range of premium sauna products including traditional and infrared models designed for optimal airflow and easy installation. Our collection of professional-grade sauna accessories and customizable vent components will help you tailor your sauna space to meet your personal comfort preferences while ensuring clean and consistent air circulation.
Take control of your sauna environment today by exploring our extensive selection at Best Life Sauna. Discover innovative sauna solutions that meet the advice outlined in this article and create a sanctuary that promotes health and relaxation every time you step inside. Don’t wait to experience the difference that proper ventilation and quality products can make — start your wellness journey now.
Frequently Asked Questions
How do I assess room requirements for effective sauna ventilation?
To assess your room requirements for effective sauna ventilation, measure your sauna’s dimensions and identify placement for both intake and exhaust vents. Ensure the intake is near the heater and the exhaust is positioned higher for optimal airflow.
What is the ideal vent placement for my indoor sauna?
The ideal vent placement involves positioning the intake vent low behind or next to the heater and the exhaust vent high on the opposite wall. This setup promotes natural air circulation and helps distribute heat evenly throughout the sauna.
How can I optimize airflow in my indoor sauna?
To optimize airflow, balance the air volume between your inlet and outlet vents and consider using adjustable vents. Make small adjustments while monitoring airflow to maintain even temperature distribution and eliminate stagnant air pockets.
What should I do to test my sauna’s ventilation performance?
Evaluate your sauna’s ventilation by checking air movement and temperature consistency, using a digital thermometer and humidity meter. Test for consistent airflow by placing a small piece of tissue paper near the vents and making necessary adjustments if airflow is blocked.
How often should I change the air in my sauna for optimal comfort?
Aim for six air changes per hour, which means your sauna’s air volume should be completely refreshed every ten minutes. Position your vents correctly to ensure this level of air exchange is achievable without compromising comfort.
What safety precautions should I take during sauna vent installation?
Always wear protective gloves and use the appropriate tools when installing vent components to ensure your safety and secure mounting. Double-check the vent placement to avoid hazards and ensure optimal airflow.